CATEGORIES:
What is the Installation Process for Community Storm Shelters? 5 Steps Explained
March 23, 2026

Community storm shelter installation is a process that transforms an empty plot of land into a storm shelter that meets FEMA P-361 guidance and ICC-500 standards. A community storm shelter can protect dozens or even hundreds of people during EF5 tornadoes. The entire process typically spans 8-12 weeks from the initial permit application to the final inspection, with each phase building on the previous one to ensure both structural integrity and regulatory compliance.
Understanding this timeline matters because communities in tornado-prone regions need realistic expectations for budget planning and grant applications.
How Community Storm Shelter Installation Actually Works
Community storm shelter installation differs significantly from residential tornado shelter construction. While a homeowner might install a 6-person prefabricated unit in a weekend, community shelters require professional engineering, municipal permits, and third-party inspection to meet ICC-500 safety standards for public occupancy during severe weather events.
The process of installing a community storm shelter can be broken into five distinct phases: site assessment and permitting, foundation work, structural installation, interior system integration, and final inspection. Each phase adds specific requirements that can’t be skipped or compressed without compromising the shelter's ability to withstand 250 mph winds and debris impacts from EF5 tornadoes.
Q: Can we build a community shelter ourselves to save money?
No. Community storm shelters require professional engineering review and contractor installation to meet FEMA P-361 standards. DIY construction creates liability issues and disqualifies projects from federal grant funding, which can sometimes cover 50-75% of installation costs.
 Underground vs Above-Ground - Installation Differences
Underground shelters may require deep excavation, often ranging from several feet to more than ten feet, depending on design and capacity. They could require extensive drainage systems to prevent flooding, and waterproofing measures that above-ground installations don't need. This additional complexity can increase total project costs by 30-50% and extend installation timelines by 2-3 weeks compared to above-ground storm shelters.
Above-ground shelters sit on shallow concrete slabs poured 12-18 inches deep, eliminating excavation costs and water management challenges. However, above-ground models require greater structural reinforcement to resist wind uplift forces, which underground shelters avoid through earth coverage. Both types provide equivalent protection when properly installed, so the choice depends on site conditions, budget constraints, and accessibility requirements for elderly or disabled community members.
Who Manages Each Installation Phase?
Site assessment involves representatives who test soil bearing capacity and water table depth. Local building departments review permit applications and conduct inspections throughout construction. Licensed contractors handle excavation, concrete work, and shelter placement, while HVAC specialists install ventilation systems. Finally, the community uses a third-party engineering inspection to verify compliance with ICC-500 standards before the shelter can legally serve as a designated community refuge.
Pre-Installation Site Assessment And Permits
Site assessment identifies potential deal-breakers before any money goes into construction. Reps will drill soil samples to determine bearing capacity, which must support the shelter's weight plus dynamic loads from tornado wind forces. Soil bearing capacity below 2,000 pounds per square foot typically requires deeper foundations or alternative shelter types, which could increase costs by $10,000-$25,000 for reinforcement measures.
Water table mapping is critical for underground installations because shelters placed below the water table require continuous pumping systems to prevent flooding. Sites with water tables within 5 feet of the planned shelter floor require French drains, sump pumps, and waterproof membranes, which could add $8,000-$15,000 to project costs.
Pro Tip: It’s best to schedule soil testing during wet seasons to identify worst-case scenario water table conditions. Testing during the dry summer months can miss high-water issues that emerge during spring storms, when shelters are most needed.
Required Permits And Documentation
Building permits for community storm shelters require structural engineering drawings stamped by a licensed professional engineer, environmental clearances for excavation near wetlands or protected areas, and FEMA P-361 compliance documentation. The documentation should demonstrate that the design meets federal safe room standards. According to FEMA's Safe Room guidance, permit approval timelines vary by jurisdiction but typically take 2-4 weeks for complete applications.
Zoning verification confirms the proposed shelter location complies with setback requirements from property lines and utility easements. Most municipalities require 10-15 feet of clearance from underground utilities and 5 feet from property boundaries to allow access for excavation equipment.
Site Assessment Checklist
Complete site assessments include locating utility lines through 811 before digging, planning accessible routes to ensure ADA-compliant pathways from parking areas to shelter entrances, and verifying flood zones using FEMA flood maps. Underground shelters usually can’t be installed in Special Flood Hazard Areas designated as Zone A or V on FEMA maps because floodwater infiltration poses drowning hazards during extended shelter occupancy.
Site Preparation And Foundation Work
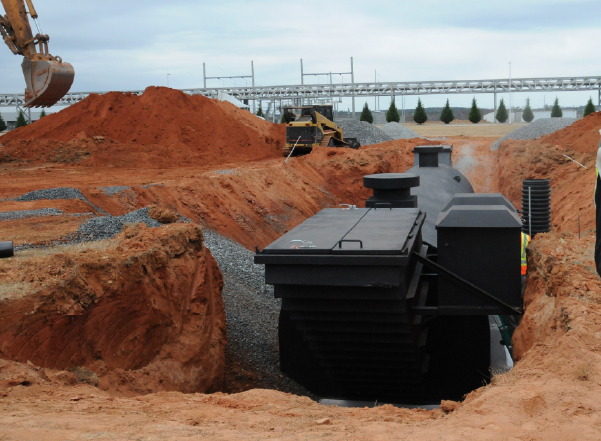
Excavation for underground shelters removes 10-14 feet of soil across an area 4-6 feet larger than the shelter footprint to accommodate concrete formwork and waterproofing installation. Excavators dig in stages, benching the sides to prevent cave-ins and installing temporary shoring if soil conditions prove unstable during digging.
Foundation concrete requires a minimum compressive strength of 4,000 psi (depending on the engineering design). Steel rebar reinforcement is placed at 12-inch centers in both horizontal directions. This reinforcement pattern resists the bending forces created when tornado winds try to lift the shelter from its foundation. Anchor bolts embedded in the concrete at 24-inch spacing provide connection points to secure the shelter structure during installation.
Key Takeaway: Concrete curing cannot be rushed. Foundation slabs need 7-10 days to reach sufficient strength for shelter placement, and a full 28-day curing to achieve rated strength. Contractors who pressure you to speed this timeline compromise structural integrity.
Excavation And Drainage Systems
Drains installed around the shelter perimeter intercept groundwater before it reaches the structure. These drainage systems consist of perforated pipes surrounded by gravel, sloped to carry water to daylight discharge points or storm sewers. Sump pump pits inside the shelter floor provide backup water removal if drainage systems become overwhelmed during heavy rainfall.
Backfill around completed underground shelters uses clean gravel or crushed stone rather than excavated soil because loose fill settles over time, creating voids that compromise drainage. Proper compaction of backfill material in 6-inch lifts prevents future settling that could crack entrance stairs or damage ventilation pipes.
Foundation Specifications For Wind Resistance
Wind uplift forces during EF5 tornadoes can exceed 100,000 pounds on a 50-person shelter, requiring foundation anchoring systems that transfer these loads into the surrounding soil. Concrete footers extend 4-6 feet below finished grade in northern climates to reach below the frost line and prevent heaving that could crack the shelter structure during freeze-thaw cycles.
Shelter Placement And Structural Installation
Prefabricated modular shelters arrive on flatbed trucks as complete units manufactured in climate-controlled facilities. Factory construction ensures consistent quality control and ICC-500 compliance, which are harder to achieve with on-site concrete pours. Crane placement requires precision within 1-2 inches of the planned position, because misalignment compromises door frame installation and creates gaps in weather sealing.
Cast-in-place concrete shelters built on-site use steel rebar cages assembled according to engineering drawings, with wall thicknesses of 8-12 inches, depending on shelter capacity and wind-rating requirements. Concrete pumps fill formwork in continuous pours to avoid cold joints that create weak points vulnerable to debris impacts during tornadoes.
Prefabricated vs Poured-In-Place Installation
Prefabricated steel tornado shelters are installed in 1-2 days once foundations cure, while poured-in-place construction takes 2-3 weeks for formwork assembly, concrete placement, and curing. On-site pours offer more design flexibility for custom capacities or irregular site dimensions.
Critical Safety Feature Installation
Doors are mounted to steel frames welded into the shelter walls, with multiple locking points and rubber gasket seals that maintain protection during the pressure differentials created by passing tornadoes. Ventilation pipes extend above ground level with debris screens and blast valves that close automatically if debris impacts threaten to compromise the system.
Emergency escape hatches provide secondary exits required by building codes, typically placed opposite the main entrance to ensure occupants have an exit option if debris blocks the primary door. These hatches must open from the inside without keys or tools to prevent entrapment.
Interior Setup And Safety System Integration
Ventilation systems for sealed underground shelters must provide a minimum of 5 cubic feet per minute of fresh air per person to prevent carbon dioxide buildup during extended occupancy. Battery-powered fans ensure continued air circulation during power outages, with backup battery capacity rated for 72 hours of continuous operation.
LED emergency lighting activates automatically when the grid power fails, drawing from the same battery system that powers ventilation fans. Lighting must provide sufficient illumination for safe movement within the shelter to prevent trip-and-fall injuries during the chaos of emergency shelter access.
Q: How many people can fit in a community storm shelter?
FEMA guidelines recommend 5-10 square feet per person for safe occupancy. A 500-square-foot shelter safely accommodates 50-100 people, depending on the expected duration of occupancy. Longer shelter stays during extended tornado outbreaks require more space per person for comfort and safety.
Essential Emergency Systems
Two-way communication equipment connects shelter occupants to emergency dispatch centers and weather monitoring services. VHF radios or cellular signal boosters maintain contact even when the surrounding infrastructure loses power. NOAA Weather Radios with battery backup provide continuous severe weather updates throughout tornado events.
Emergency supply storage includes first-aid kits sized to the shelter's capacity, along with trauma supplies for treating injuries sustained during shelter access. Storing one gallon of water per person supports basic needs during extended shelter stays when exterior conditions prevent a safe exit.
Accessibility And Capacity Planning
ADA-compliant shelter entrances feature ramps with a maximum slope of 1:12, handrails on both sides, and door openings at least 36 inches wide to accommodate wheelchairs. The interior wheelchair turning radius requires a 5-foot-diameter clear floor space, reducing effective capacity calculations by 15-20% compared to standard occupancy ratings.
Bench seating along perimeter walls maximizes capacity, while providing rest areas for elderly occupants during potentially extended shelter stays.
Final Inspection And Community Access Setup
Third-party engineering inspection verifies that completed shelters meet ICC-500 design standards and FEMA P-361 construction requirements. Inspectors examine structural connections, door seal integrity, ventilation system capacity, and emergency lighting function. According to NOAA StormReady program data, shelters that fail initial inspections most commonly have ventilation deficiencies or improperly installed door seals.
Pressure testing confirms door seals maintain protection during the rapid pressure changes that occur as tornado vortices pass over shelters. Test equipment applies positive and negative pressure differentials while inspectors check for air leaks around door frames and ventilation penetrations.
Inspection Requirements And Testing
Building department final inspections verify code compliance for electrical systems, emergency lighting, exit signage, and accessibility features. Inspectors confirm that ventilation capacity calculations match the actual occupant capacity, with documented test results of the shelter’s fans showing that airflow meets FEMA guidelines. Any deficiencies identified during inspection must be corrected and re-inspected before the shelter receives occupancy approval.
Community Access And Training
Directional signage, also called wayfinding signage, must meet retroreflective standards for nighttime visibility. Signs placed at major intersections and along primary access routes guide residents during the limited warning time before a tornado strikes.
Community training sessions familiarize residents with shelter locations, access procedures, and expected protocols during severe weather events. During emergencies that require rapid access to shelter and provide very little time to make decisions, hands-on drills reduce panic and confusion.
Installation Timeline And Cost Breakdown For Community Shelters
Complete installation timelines range from 8 to 16 weeks, depending on shelter type and site conditions. Permit approval can take 2-4 weeks at the start of the project. Site preparation and foundation work can take 2-3 weeks, including concrete curing time. Structural installation can take 1-3 weeks, depending on whether the structure is prefabricated or cast in place. Interior finishing and system installation adds 1-2 weeks, with final inspection and approval taking another 1-2 weeks.
Timeline By Installation Phase
- Permits and approvals: 2-4 weeks, depending on jurisdiction complexity.
- Site preparation and excavation: 1-2 weeks for equipment mobilization and digging.
- Foundation installation: 2-3 weeks, including a 7-10 day concrete curing period.
- Shelter placement and structural work: 1-3 weeks, varying by construction method.
- Interior finishing and systems: 1-2 weeks for mechanical, electrical, and safety equipment.
- Final inspection: 1-2 weeks for testing and approval processes.
Financing Options And FEMA Grant Programs
FEMA Hazard Mitigation Assistance programs can provide cost coverage of 50-75% for community storm shelters in qualifying jurisdictions. Communities must contribute 25% matching funds, which can come from local budgets, private donations, or in-kind labor contributions. Average grant awards range from $50,000 to $300,000, depending on shelter capacity and community population.
Grant applications require demonstrated tornado risk through historical severe weather data and community vulnerability assessments. FEMA prioritizes funding for underserved communities lacking existing shelter infrastructure and areas with documented tornado frequency exceeding regional averages.
FEMA Grant Application Process
Applications are submitted during annual hazard mitigation planning cycles, typically 6-18 months before construction is scheduled to begin. Required documentation includes engineering feasibility studies, site control verification, environmental review clearances, and community needs assessments demonstrating shelter demand. According to FEMA's Hazard Mitigation Assistance program, approval rates vary by state but average 40-60% for well-documented community shelter applications in high-risk tornado zones.
Alternative Financing Strategies
Municipal bonds spread shelter costs over 10-20 year repayment periods, reducing immediate budget impacts for resource-constrained communities. State emergency management agencies offer supplemental grants that reduce local matching fund requirements to 10-15% in some jurisdictions. Non-profit organizations, including churches and schools, can apply directly for FEMA grants to designate shelters for community-wide access during emergencies.
Common Installation Mistakes That Compromise Safety
Inadequate foundation depth is the most common structural failure, occurring when contractors minimize excavation costs by pouring shallow footers that don't reach below the frost line. Frost heave during the winter months cracks shelter walls and compromises door-frame alignment, creating gaps that allow debris penetration during tornadoes.
Poorly installed drainage leads to flooded shelters within hours of heavy rainfall. Underground shelters without properly sized sump pumps and French drains accumulate groundwater, creating drowning hazards and rendering facilities unusable exactly when communities need protection during severe weather outbreaks.
Pro Tip: Demand written documentation of concrete strength tests before allowing shelter placement on foundations. Contractors pressuring early placement to meet deadlines compromise structural integrity that can't be corrected after installation.
Structural Failures To Avoid
- Rebar spacing exceeding 12 inches reduces concrete reinforcement and could compromise ICC-500 compliance for debris impact resistance.
- Concrete strength below 4,000 psi creates vulnerabilities to cracking under tornado wind loads and debris impacts.
- Foundation depth less than local frost line specifications causes seasonal heaving that damages shelter structures.
- Anchor bolt torque below engineering specifications allows shelter uplift during extreme wind events.
- Door frame misalignment by more than 1/4 inch creates seal gaps that compromise pressure protection.
Why Professional Installation Matters
DIY community shelter installation creates liability exposure for municipalities if structural failures occur during actual tornado events. Insurance coverage requires professional contractor installation with proper licensing, bonding, and ICC-500 certification documentation. FEMA grants require professional engineering oversight throughout construction, with third-party inspection verification before final payment approval.
Low-bid contractors who lack storm shelter experience frequently underestimate foundation requirements, ventilation system complexity, and waterproofing needs that distinguish functional shelters from dangerous failures.
When public safety, liability, and long-term performance are on the line, choosing the right shelter partner matters. Our community shelters are engineered to meet or exceed FEMA and ICC-500 standards, with professional installation, certified materials, and experienced project support from planning through final inspection.
Whether you’re a municipality, school district, or commercial developer, our team can help you design a compliant, cost-effective solution that protects occupants and satisfies grant, insurance, and code requirements. Contact Survive-A-Storm to discuss your project and get expert guidance on the right community shelter for your location.


Frequently Asked Questions About Community Storm Shelter Installation
How do you choose the right location for a storm shelter?
The ideal site should be centrally located within the community to provide quick and easy access for all residents, minimizing travel time during emergencies. It is essential to select an area with stable, well-drained soil to prevent flooding and structural instability; elevated ground or gently sloping terrain often works best. Additionally, the location must be away from potential hazards such as floodplains, industrial sites, power lines, and large trees that could fall during storms. Accessibility by emergency vehicles and compliance with local zoning regulations and building codes are also key considerations.
How is the size of the community storm shelter determined?
Determining the size of a community storm shelter involves assessing several key factors to ensure adequate protection and comfort for all occupants. First, calculate the total number of people the shelter is intended to accommodate, including residents, staff, and potential visitors during emergencies. Next, consider the recommended space per person, as outlined in safety guidelines—typically 5 to 10 square feet per person—to allow for seating and movement. Additionally, factor in storage space for emergency supplies, such as water, food, first-aid kits, and communication devices. The shelter’s location and expected duration of use also influence size requirements; shelters designed for longer stays may need extra room for sleeping arrangements and sanitation facilities.
How do I ensure my community storm shelter meets local building codes?
To ensure compliance with local building codes during the installation of community storm shelters, it is essential to begin by thoroughly researching and obtaining all relevant permits from municipal or county authorities before construction. Engaging with local building officials early in the planning phase allows for a clear understanding of specific requirements related to structural integrity, materials, ventilation, and emergency exits tailored to regional weather conditions. Collaborating with licensed architects and engineers who specialize in storm shelter design ensures that all plans meet or exceed code standards. Additionally, scheduling regular inspections at key milestones throughout the installation process helps verify compliance with safety regulations and enables timely corrections if needed. Maintaining detailed documentation of all approvals, inspections, and modifications further supports compliance and provides a reliable reference for future maintenance or audits.
How do you obtain the necessary permits for construction?
Getting the necessary permits for constructing community storm shelters typically begins with submitting a detailed project proposal to your local building department or municipal planning office. This proposal should include architectural plans, engineering reports, and site evaluations that demonstrate compliance with local zoning laws, safety codes, and environmental regulations. It is essential to consult with licensed professionals who specialize in storm shelter design to ensure all structural and safety standards are met. After you submit the proposal, the application is reviewed by various city departments, including building inspectors, fire marshals, and sometimes environmental agencies. Public hearings or community consultations may also be required to address any local concerns.
How should communities conduct storm shelter safety drills?
Conducting safety drills for community use involves a systematic approach to ensure preparedness and an effective response during emergencies. First, coordinators should develop a clear drill plan outlining objectives, roles, and procedures tailored to the specific hazards the community may face, such as tornadoes or severe storms. Before the drill, it is essential to inform all participants of the schedule and purpose, and to emphasize the importance of active participation. During the drill, simulate realistic scenarios by activating alarms and guiding residents to designated storm shelters, ensuring that evacuation routes are clearly marked and accessible. Safety officers or volunteers should monitor compliance, assist vulnerable individuals, and evaluate response times.
How can communities fund the installation of a storm shelter?
Funding the installation of a community storm shelter typically involves a multifaceted approach that combines local government support, federal and state grants, and community fundraising efforts. Communities often begin by applying for grants through agencies such as the Federal Emergency Management Agency (FEMA), which offers financial assistance for disaster-preparedness infrastructure. Additionally, state emergency management offices may provide matching funds or low-interest loans to supplement these grants. Local governments can allocate budget resources or issue bonds dedicated to public safety projects. To bridge any remaining financial gaps, communities frequently organize fundraising campaigns, seek donations from local businesses, and partner with nonprofit organizations focused on disaster resilience. By leveraging these diverse funding sources, communities can effectively secure the capital needed to install a robust and accessible storm shelter that enhances public safety.
How should a community storm shelter be maintained after installation?
Maintaining a community storm shelter post-installation involves a systematic approach to ensure its reliability and safety during emergencies. Regular inspections should be conducted at least quarterly to check for structural integrity, including cracks, leaks, and signs of wear and tear in walls, doors, and ventilation systems. It is essential to test and service all mechanical components, such as air filtration units, emergency lighting, and communication devices, to ensure they function correctly when needed. The shelter should be kept clean and free of debris, with supplies like water, non-perishable food, first aid kits, and batteries replenished regularly according to expiration dates. Additionally, organizing periodic drills with the community helps familiarize residents with shelter protocols and identify any operational gaps.
Author